Wednesday, August 28, 2013

A Berry Disaster and "Pee Boo"

I love berry picking. I do. Especially elderberries. I love to make Strawberry-Elderberry jam for the winter months. It's packed full of good-for-you-ness and it tastes really good too. I wait all summer long to find out when the berries are ripe for picking. Usually we go along the roadsides and pick them there for free, so it's a hard process. There's no farmer to call and ask "are they ripe yet?" Just many trips into the country to scrutinize the roadsides for those juicy purple heads drooping almost to the ground with delicious berries.

This summer was no different. We waited and watched. The place that we pick is a good 40 minutes from where we live, so it took several trips to determine that the berries we at last ripe this past weekend.

Josh and I dropped Molly off with Grandma and Grandpa, grabbed our bags and scissors and hats and headed off into the country. We found lots and lots of beautiful berries. I would be stocked all winter with jam. I was so happy! (Are you starting to feel like something is about to happen because I am writing in past tense? ;) )

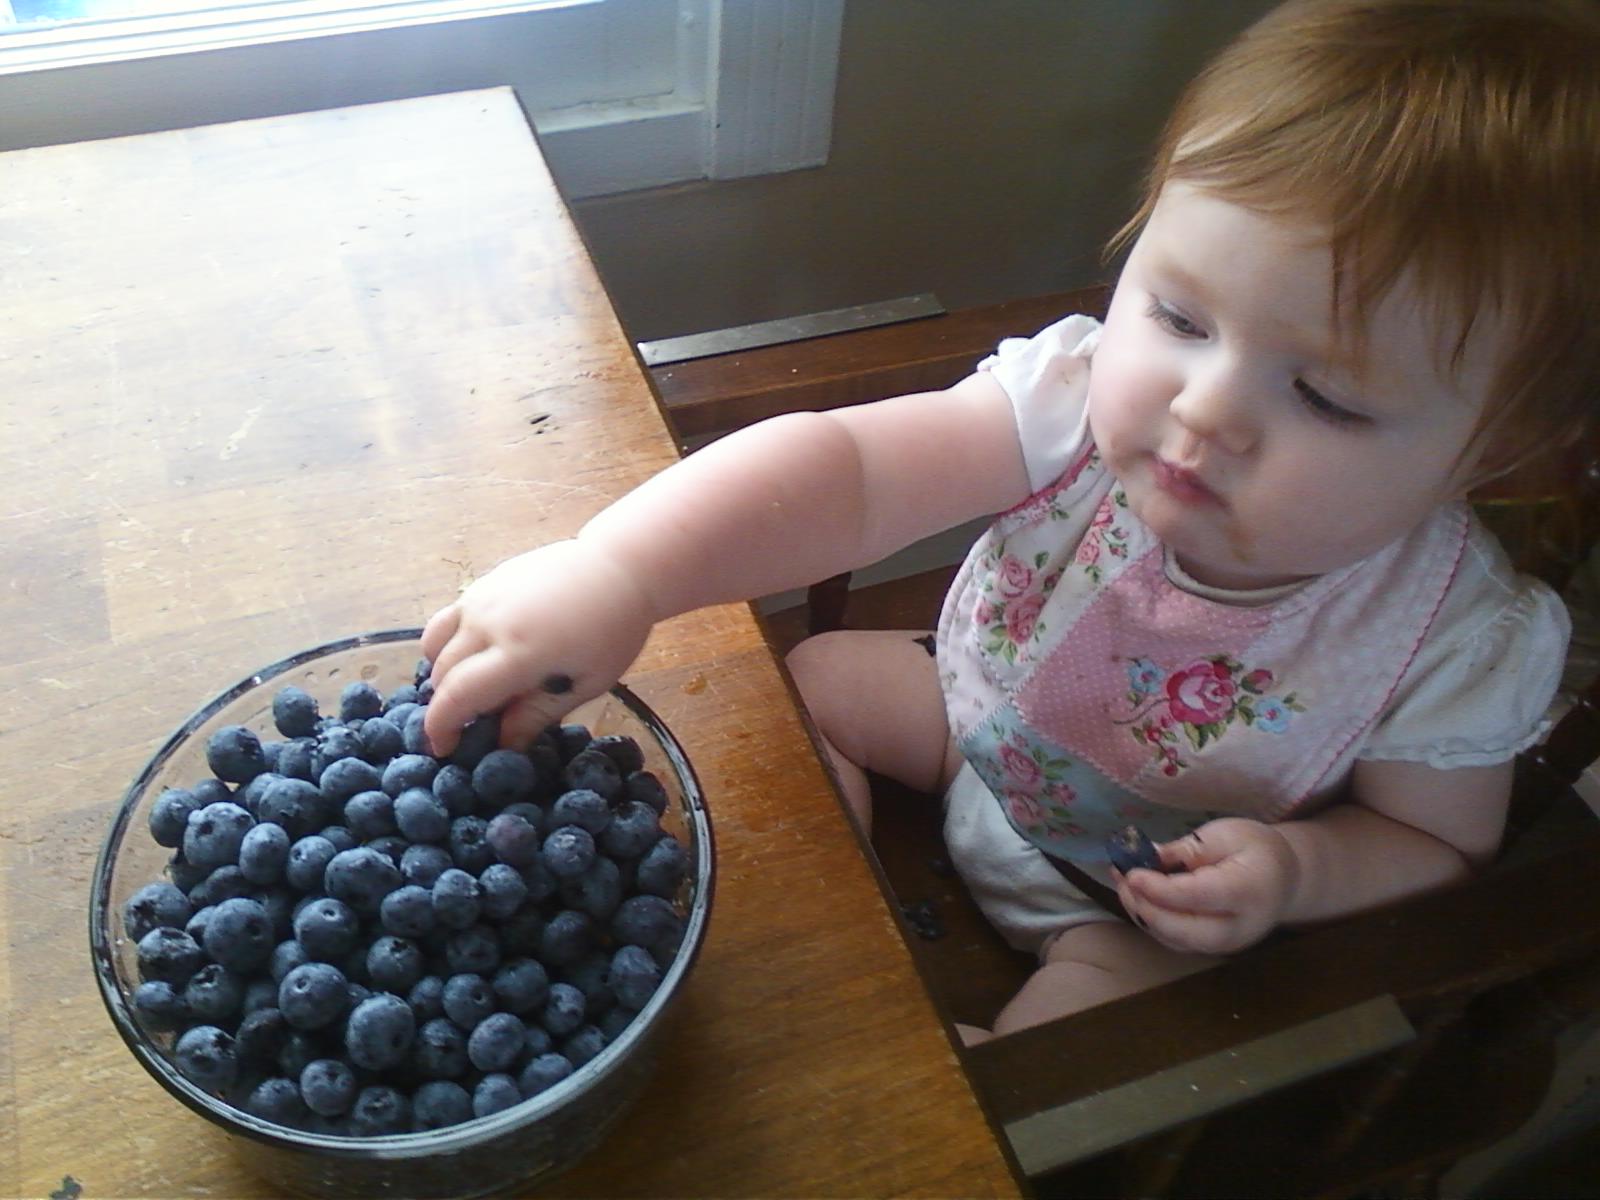
When we came home, we set the bags outside for a bit to let the bugs out. Then we put them in the front porch until I could get to them. Now, let it be known, I have left berries in the bags for a day or two before. Nothing new about that. And they were always fine. So, I did the same thing. We were busy, so I put it off a little while, but not too long, I thought. Finally, last night I knew it was time to get to them. I took the bags outside, got a chair and a bowl and went to work.

My first clue should have been the fact that there was a funny smell. Not quite a rotten smell, just a strong, sweet, funny, berry smell. But it has been 90 degrees or more the last few days, so I thought it was just a hot berry smell.

The second clue should have been the cloud of fruit flies and other flies that came up off of the berries. I thought that a little strange, but the berries on top of the bag still looked nice so I dove in, optimistic that I could at least use most of the berries.

By the time I got to the middle of the bag, the berries were changing. They were soggy, and not the same color as before. I began examining more closely. Some of the were definitely rotten. Hmm. And then I found a maggot. Not a huge one, but a maggot all the same. GROSS. That led me to examine my bowl of "okay" berries. There were more maggots crawling all through it! Bleck!

The final straw, though, was when I looked at my hands. They were covered in purple stain, and clinging to my hands and fingers were many little maggots! All over! And they didn't want to come off, either. They were stuck to my skin almost like they were glued there! I shrieked very loudly, called my husband to watch the baby, who was sitting in her stroller watching me, told him I had an emergency, and dashed into the kitchen to scrub my hands in soap and hot water.

Can you spell DISGUST? I was absolutely horrified. If there's one thing I hate (which I'm sure there are many, but  . . .) it is maggots. They are just about the lowest of the low, the scum of the earth, in my opinion. And to find them crawling all through my beautiful berries which we worked so hard to get, and then crawling all over my hands, well . . . I was plain outraged.

I went back outside and sat down as despondent as could be. I think I really did almost cry. My daughter just looked on in wonder at the scene, and my husband quietly took all the bags around back to the compost pile. And that's that. My berries sit out there now, composting, and crawling with maggots. What a disaster.

I have learned my lesson. Don't let bags of berries sit on the front porch for more than a day, if that, in 90 degree weather. Next time I see a cloud of bugs coming off the berries, don't even try to salvage. Just compost. It will save a lot of yuckiness in the long run.

On a happier note, after the berry incident we came inside, and Molly promptly showed me that she had learned to play peek-a-boo by ducking down behind the coffee table and popping up at me over and over. That made my day. And she has the cutest way of saying peek-a-boo. It sounds like a really high, squeaky, "PEE!" followed by a slightly lower but still squeaky "BOO!" "PEE BOO! PEE BOO!" over and over. It was lots of fun. I actually got a video of her doing it, so I'll share that below. :)


Tuesday, August 20, 2013

Sweet Potato Chili

Fall is, or was, in the air. August is teasing me, I think. I've been about ready to pull out scarves and sweaters several times now. You know, that pleasant nip on your nose as you walk out the door? Cool breezes blowing leaves around? I felt it, I really did! Since fall is my favorite season, I get a little excited when I think it's about that time again. But this week has told me to calm down. Soon, it will be here soon, but not yet. August wants one more chance to be summery and hot and muggy. Then fall can come. I'll try and be patient just a little longer.

In preparation for fall, though (cause you gotta be prepared!), I pulled out one of my all-time favorite chili recipes. It's sweet, but has a little spicy kick. The combination is just fabulous. The perfect thing for a late-summer-acting-like-fall day.

I was happy to find a couple of sweet potatoes at the farmer's market this weekend that were almost the size of footballs. Huge. And delicious. This recipe calls for 2 medium sweet potatoes, but I only needed one of these monsters. Regrettably, I forgot to take pictures. In fact, I only have a couple for this post, but all you really want is the recipe anyway, right? So . . . on to chili . . .

Sweet Potato Chili


Ingredients: 
2 medium sweet potatoes, chopped
2 pounds ground beef, turkey, venison, etc,. 
1 28ish ounce jar of original spaghetti sauce
2 -3 tomatoes diced or 1 can diced tomatoes
1 yellow onion, chopped
1 can black beans
1 can red kidney beans
1/4 cup apple cider vinegar
1/4 cup dark brown sugar 
1/4 cup ancho chili powder
2 tablespoons red chili powder
1 tablespoon cayenne pepper
salt and pepper to taste

Directions: 
Brown ground meat in a large pot (I used my cast iron dutch oven, which works very nicely for chili, but I think any large pot should work fine). When meat is almost all the way cooked, add the brown sugar (gives the meat a nice flavor), onions and sweet potatoes. Cook covered for about 20 minutes, stirring every few minutes, until the potatoes are soft. Add in the spaghetti sauce, tomatoes, beans, and cider vinegar, and mix well. Let that cook a couple of minutes. 

Mix together the chili powders, the cayenne, and the salt and pepper (probably about a tablespoon of each, and then you may add more when you taste test). Add the mixture to the chili and stir in thoroughly. 

The last step is my favorite. Taste test! Add more sweet, more spice, more salt, or whatever you think the chili needs. The dominant traits should be sweet first, with a kick of spice in the aftertaste. Then get a nice big bowl, maybe some cornbread, and enjoy! 


Monday, August 12, 2013

Whole Wheat Buttermilk Pancakes

We tried creating a recipe recently. I love buttermilk pancakes, but I also like to use more whole wheat than white flour. I thought perhaps we could come up with something yummy by combining the two. Here's the recipe I came up with. We really liked them a lot!

Sometimes whole wheat pancakes are grainy, so it depends on the flour you use. I've been using the Prairie Gold Whole Wheat Flour, and I really like it. It's ground super fine, so it not too heavy, but still gives that nice, hearty whole wheat taste. I purchase mine at Walmart or Hyvee most often, but I'm sure it's pretty widely available. But anyway, here's the recipe.


WHOLE WHEAT BUTTERMILK PANCAKES

Makes about 6 smaller pancakes (which are pretty filling. Fed my husband, me, and our always-hungry toddler perfectly)

1 cup whole wheat flour
1 teaspoon baking powder
1/4 cup white sugar
pinch of salt
1 large egg
3/4 cup buttermilk (often I don't have buttermilk, so I make it. For 3/4 cup, use about 2/3 cup milk, and make up the difference with some apple cider vinegar. Measurements don't have to be terribly exact).

Heat a skillet or griddle to medium heat (it  really just depends on what you're using. I usually use my cast iron skillet on a gas stove, which needs to be low-medium heat. You might have to experiment a little if you haven't done pancakes before). Once hot, spray or butter the pan/griddle so the cakes won't stick.

Whisk the dry ingredients together. Add the egg and the buttermilk and mix in thoroughly until you have a nice batter. It shouldn't be too thick (like cake batter). It should be about the consistency of pudding, more or less. You can add more buttermilk if you like your pancakes a little thinner, too. These were nice and fluffy. This is what my batter looked like:


Using a deep spoon or a measuring cup, make a little circle of batter in the middle of your pan (or several on a griddle). I think I did mine about 1/3 cup, more or less, but that's completely up to you.

Cook the cake until the sides look golden and the middle is bubbly, about 2 minutes.


 Use a spatula and flip the cake over, and cook the other side for about a minute more. If the other side is golden like the top, it's probably just right. Continue doing this until all the cakes are cooked (or you can probably store the rest of the batter in the fridge for a couple of days. It will probably need to be covered well, and stirred well when you go to use it again).

Finally, use some butter and pure maple syrup (or whatever you love on your pancakes), and ENJOY!


Saturday, August 10, 2013

Blueberry Buckle

Molly and I had some time this morning to do some baking. I scored a really good deal on blueberries this week, and so I thought we'd incorporate those somehow. After searching Pinterest for a little bit, I came upon a delicious-looking recipe for blueberry buckle on this blog. For those of you that have never had blueberry buckle, it's kind of a delicious combination between blueberry streusel muffins and a blueberry cake. It's really, really good, and I hadn't made one in a long time. We decided to try that one out today.

I tripled her recipe because I needed a dessert to take to my mom's tonight, and I also thought I could bring some to church tomorrow. I also made a few minor changes, so here's my take on it. Enjoy! :)

BLUEBERRY BUCKLE: 

Makes a 9x13 pan

Preheat oven to 350 

Cake Batter: 
2 cup white all purpose flour (I used Hodgkins Mill, which is unbleached, but it's so much healthier)
2 teaspoons baking powder
pinch of salt
1 stick unsalted butter, room temperature (I often just microwave mine until it's barely soft, since I tend to make things on the spur of the moment)
1 cup white sugar
2 large eggs
1 teaspoon vanilla 
2/3 cup milk (I think it would be delicious if someone tried buttermilk. I didn't think of that until later, though)
3-4 cups of fresh blueberries (I just used a dry pint or so)

Streusel Topping: 
2/3 cup flour
2/3 cup brown sugar (her recipe calls for white, but I love brown sugar streusel)
1 teaspoon of ground cinnamon
1 stick of cold butter, cut into pieces

First thing I did was rinse my beautiful, juicy blueberries off. Aren't they lovely? 


Then I had my Little Helper assist me in tasting the blueberries. I think she approved. :) 


After we tasted inspected the blueberries carefully, we moved on to the recipe. First we mixed the flour, baking powder, and salt together in a separate bowl. I am often tempted to skip this step and dump the dry ingredients right in, but I didn't this time. There's a careful hand mixing process later. 


Next we made up the streusel. If you haven't done streusel before, just mix the flour, sugar, and cinnamon together, and then add the pieces of butter. You can used a pastry cutter or something like that. I just usually use my hands. Work the butter in until the mixture is nice and crumbly. 


Once that was done we set all of those bowls aside and started work on the wet ingredients. 


First, we creamed the butter in our kitchen aid until it was nice and smooth. Then we added the sugar and blended on medium speed until it was light and fluffy (just a minute or two). Then we added the eggs and vanilla one at a time, blending on slow, and mixed until they were incorporated. 

At that point, we took the blending bowl off of the mixer and added about half of our flour mixture. I worked it in gently by hand with a spatula, and added about half the milk. I repeated that with the second half of the flour and the milk, mixing gently until just incorporated (we're doing this gently so it stays nice and fluffy). It looked like this when I was done. 


Then we greased the pans lightly (in your case, the 9x13 pan), and gently spread the mixture into the pans. 


Then we added the blueberries


And finally the streusel. 


Molly and I both agreed it looked good enough to eat already! 


Finally we popped them into the oven for a good 40-50 minutes, until a fork or toothpick inserted in the middle came out clean. The house smelled absolutely wonderful! 

We are very excited to try this out tonight! Would be wonderful warm with some vanilla ice cream, I expect. ;) 


Thursday, August 8, 2013

DIY Farmhouse Coat Rack

So my hubby and I have been working on a project the last week or so. I've been wanting to make a coat rack for our front porch. Something rustic and "farmhousey", but sturdy with lots of room for coats and hats. I had seen pictures on Pinterest of "peg" coat racks, and I really liked the look.

The design we came up with was so easy, and cost us under $3.50 to make. Here's a picture of the finished rack. Neat, huh?


The materials we used were:

1 sturdy pallet board
a wooden dowel about 1 inch in diameter (I think we used pine, but it wouldn't matter much)
2 cups day old (or older, just basically leftover) coffee
2 cups white vinegar
1 steel wool pad
wood glue
wood screws
a drill
a 1 inch paddle bit

We started with cutting the dowel. (I didn't know I was going to do a tutorial until last minute, so sorry, lots of skipped pictures . . . ) Josh cut 6 pegs about 3 inches long, and then cut one end of each diagonally so that they would angle upwards.

I then took them and soaked them overnight in the coffee and vinegar with the steel wool floating in it. I got this idea from this blog, where they brushed the mixture onto the wood. I wanted a really dark stain, since my pallet board was dark, and I wanted the dowel pieces to look a little more aged, so I soaked them. You could totally skip this process, though, and paint or stain a different way. Tons of options there. They really turned out great!


After soaking all night, I placed the dowels on paper towels and let them dry out for the day.

Once they were ready I placed them on the board where I wanted them and traced around them with a pencil.


Josh took the board to the garage and used the paddle bit to make a little indention for each dowel to sit in. Then a dot of glue in each, and he put a screw into the back of each through the board.

And that was about it! He hung it up for me on the porch, and I just love it! Rustic, sturdy, "farmhousey", plenty of room, all of that! I can't wait for colder weather so we can actually use it a bit more. For now it will have to be content holding Josh's ball caps. :)